Wednesday, June 27, 2012

Summer Memories

Hi! It's Aliza (again), with another summer layout for you. I still have so many memories yet to be scrapped from last summer, which we spent in Israel. The Crafting Jewish Style papers muted tones always match my pictures, and they always look good layered together. 


Looking at these pictures I can still feel how crisp and cold that water felt as we hiked through and dunked our heads in it. It was delicious.

Well, I'm off to make some new summer memories! Enjoy!

Wednesday, June 20, 2012

Summer Sketch Fun


Hi! It's Aliza here. It's the first day of summer, and  everyone in my home is finally on summer vacation. It feels so good. In these lazier days of summer, what  better way to get some scrapbooking done than using a sketch for your design? Here's one for you designed by Nili:


Julie was inspired by the sketch to scrapbook photos of her daughter at preschool during the fall holidays. As a preschool teacher in a Jewish preschool, I particularly loved reading her journaling; It was a nice reminder, as I enjoy my summer vacation, why I do what I do. 

But back to Julie. Her journaling reads:

When your teachers gave me these pictures of you from the fall, it made me smile.  First of all, you look so much younger than you do now after finishing your first year of pre-school.  But also, it makes me proud to see how you're embracing the Jewish holidays and learning all our rich traditions.  Pictures from Fall 2011, written June 2012"


As for me, it"s been almost a year since my son's bar mitzvah, but I still love to reach into the stack of hundreds of photos, pull one out, and make a scrapbook layout. This is a picture of my brother in law and my nephew (who has since become a bar mitzvah himself).


Thanks for stopping by!


Wednesday, June 6, 2012

Happy Father's Day

Hi Everyone!  Julie here.  When it came to sign up for the next round of assignments, I jumped on doing Father's Day cards.  First of all, I love making my own cards and secondly, I was looking forward to creating something that wasn't Judaic with the CJS papers.  These papers are so great for our Judaic memories but they're also so versatile that they can be used for anything.

I stuck with the idea of doing a card with each product line.  This first one with the Passover papers.  I liked making the flower with the striped paper.  


This one is with the Passover line.  The big stamp is from Unity Stamps and font is Close To My Heart.

This card is with the Hanukkah line.  I was SO happy to not use blue and take advantage of the orange and yellow as the base colors.


Hope you have a special day with the Dads in your life.  Thanks for looking!

Sunday, June 3, 2012

Shavuot Layout

Shavuot around here was pretty simple. My older son was away, and we had most of our meals at home. We just had many hours of shul going, reading and playing, and eating cheesecake. Which sounds like a perfect holiday to me. So when it came time to scrapbook about Shavuot, the detail that stood out as the most special to me,was when my older son said he would miss us while he was away. As you can see, I like the small details.


I've been inspired by all the washi tape out there, and while I don't actually own any, I read somewhere that you can use strips of paper for the same effect. After stamping the page a bit, I added strips of paper from all of the Crafting Jewish Style lines, a couple of stickers, and voila! A simple page about a simple Shavuot spent at home.

Wednesday, May 23, 2012

Paper flowers for Shavuot from Crafting Jewish Style

 When decorating for Shavuot flowers are the way to go. Homes and synagogues are customarily filled with flowers to remind us of how flowers bloomed on Mt. Sinai at the time of the giving of the Torah. I usually decorate with whatever is growing in my garden, supplementing the bouquets with some stems from the local supermarket. I find that if  I follow my ABCs of flower arranging they usually look great!
A.cut the stems short , remove all extra foliage,and place the blooms in a low container .
B. stick to a basically monochromatic color scheme.
C. Use loose, puffy,large-headed flowers such as peonies, hydrangeas, old fashioned roses, or even carnations.
                           Shutter Beach Style                                                           Martha Stewart

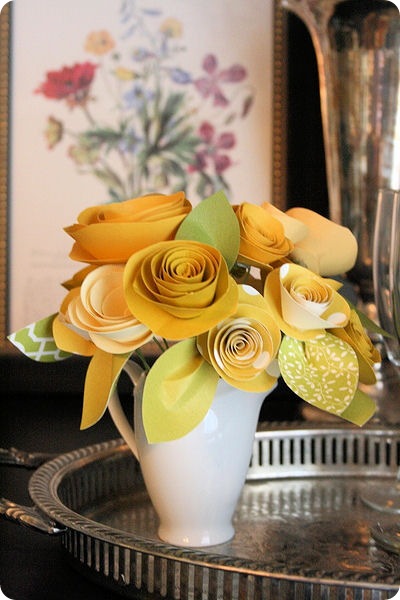
This year in addition to my natural bouquets I decided to try my hand at making some paper flowers. These flowers seem to be all over the design, decorating and scrabooking sites and they look like a fun and easy activity to do with kids. I followed this tutorial from Jones Design Company with some really nice results.
Jones Design Company

Crafting Jewish Style version

What you will need:
scrapbooking or copier paper 
florist wire or pipe cleaners
scissors, pencil, low temp glue gun

How to do it:

1. Cut a out an 8" or smaller wavy circle from your paper (I used an assortment of papers from the Hanukkah and Rosh Hashanah lines)

2. Cut a spiral in the circle.

3. Starting with the outer loose end roll the spiral into a tight coil. It should begin to look lie a rosette.

4.  Release the coil and fluff a bit then hot glue the coil to the center of the spiral. Press down to adhere.

5. Glue a wire stem or pipe cleaner to the bottom of the flower. Cut out a leaf shape from green paper pinch and glue to over the stem at base of flower.


Variation: Flower place cards and/or napkin rings

Instead of gluing a stem onto the flower adhere a ribbon to the base to be tied around the napkin. Or, stamp or write your guests name on the leaf and then adhere to the base of the flower for a simple and pretty place card.

 I hope you enjoyed this tutorial. How do you decorate for Shavuot? Will you be celebrating with friend and family? Check this site out for more info about the holiday and some great recipes.

Sunday, May 20, 2012

May Sketch

It's time for a new sketch. This month's sketch was designed by our own Nili. It has room for 2 photos, journaling, and plenty of space for creativity.


Lisa used the sketch to create this wonderful layout of her daughter's confirmation. She added a few doilies which very popular right now, and work perfectly for a girl layout.


Since today is the last day of Hebrew school, I decided to use the sketch to make a card for one of the teachers.  I used the Rosh HaShana collection and some Jewish-themed stamps that I had.


I hope this sketch inspires you to create. We would love to see what you've done.

Monday, May 7, 2012

Yom Ha'atzmaut according to a 3 year old


My younger daughters celebrated Yom Ha'atzmaut at their pre-school two weeks ago.  They had a big party to celebrate.  Everyone, including the teachers, face painted the Israeli flags on their cheeks.  When my husband asked M what they did in school today, the journaling is their conversation. 

It says:
Dad - How was school today?
M - Fun. We ate Israeli cake. (note: I made the cake with store bought cake mix)
Dad - Why did you eat Israeli cake?
M - Because it was Israel's birthday.
Dad - How old you think Israel is?
M - I think old.  Probably 4.


I guess when you're 3.5, 4 is pretty old.  

I hope you all enjoyed your Israeli cake for Yom Ha'atzmaut!
Julie

Wednesday, April 25, 2012

April Sketch

Hi Everyone,

It's Julie and it's my turn to post some fabulous LO's created by our creative CJS Design Team.  We were asked to create a Layout using the following sketch.


Personally, I'm a big fan of sketches.  It gives me a base as a jumping off point and then I can get creative from there. 


Our first creation is from Irit.  I love that her photo shows off her family's seder table.  And I love that instead of using the text, she used so many of the Passover line embellishments to tell her Passover story.  The embossed Star of Davids match the colors as well.


I love the simplicity of Aliza's LO.   Here's the description she sent me.   "It's a picture of my husband at my son's Bar Mitzvah, and I just love the way he can talk and joke with people from all backgrounds and walks of life. And the Hebrew quote is "Who is wise? He who learns from every person"  Beautiful quote.


Because I wanted to use a vertical picture, I turned the sketch on it's side.  I always forget to do this but it really can totally change the way the sketch looks and make it look completely different.  I took this picture at my daughter's class Shacharit service.  She's reading from her Siddur and, along with her classmates, ran a whole Saturday Shabbat service.  I heat embossed the Star Of David from a stamp by outlinesrubberstamp.com.  They have some really nice Judaic stamps.


Hope these layouts gave you a little inspiration and understanding on how you can take a basic sketch and be completely creative with it.

Julie

Saturday, April 21, 2012

Passover layout

Hi,
It's Shir and I want to show you another layout I created.
Last year my mom went to China, for a trip. My dad and my brother stayed in Israel. Since we celebrate Passover (and Rosh Hashana) alternatively - once with my husbands' family and once with mine - we asked my brother and my dad to join us... My dad won't miss any chance to be with my girls :-)
Anyway - This is me, in the middle :-) My girls & my dad in the picture...
I took this elegant paper and started to layer pieces that I tore. I also used a sticker on the side of the picture.
After I stamped the title I wanted to add the journaling there, so I adhered the baker's twine. But eventually I decided to leave it and write else where...

What do you think? Do you love layers? Do you tear your papers?


I appreciate your comments :-)

Sunday, April 15, 2012

Passover Highlights

We had a lovely passover this year...I chose to create a layout with all my favorite highlights of the two nights of seder that we enjoyed and went with a simple grid to keep the focus on the photos.  I let the "freedom dove" paper work for me a bit and used it for my background and cut up another piece to popdot the title and dove.  I cut words out of the "family together" paper and pop dotted those on a few photos, too. 

All in all a simple but elegant layout with highlights of the year.  Hope you all enjoyed your Pesach and made some special family memories!

Wednesday, April 4, 2012

Chag Sameach!

Hi everyone, Juls here.  I hope this finds everyone enjoying Spring Break and hopefully not too crazy getting ready for your seder on Friday night. 

My project to share with you today is a wine holder that can be used on your seder table.  With 4 glasses of wine multiplied by a few drinkers, a bit of wine is consumed as we celebrate our Exodus.  I created this wine holder/coaster and it was really simple and fun.  I used a plain wood box that I bought at Joann's and just used the bottom half.  I wanted to put the top on the bottom to create a little more dimension but the top wasn't flat so it wouldn't sit flat on the table.  Oh well, I'll look for a flat top box next time. 

Anyway, I cut out a 4x4 piece from the Four Fab Cups paper and cut out the 4 glasses. 
 
That's what's on the bottom.  I used 4 pieces of the backside of Four Fab Cups  to line the inside.  I cut the strip of the pink wine glasses from the Tags and Border paper and glued those on the sides of each of the Pesach Dots paper which line the outside.  Then I cut out 4 words from the Family Together paper.  Glued everything down with Mod Podge and a couple of top coats to seal it in and make it shiny and voila!  A nice holder for you seder bottle of wine.


I wish everyone a wonderful holiday filled with lots of family, fun and matzoh!!

Sunday, April 1, 2012

Happy Passover!

Hello, my dear crafting Jewish friends! Irit is here again and this time I want to wish you all a very Happy Passover with my new Passover card!
This card was made with CJS Passover kit only, I just added some ribbon for the shabby finish look.
And here are some of my tricks to make a nice card on just 10 minutes:
Use a collection kit- someone made it for you and every single paper there fits all other products.
Cut some stickers apart, as I did with three small dot stickers and use them for you visual triangle.
Try to layer your papers and stickers with some 3d glue for a nice texture and dimension.
You can use the stickers set name on your projects as  it's already glued, as I did with a word Passover on my card.
Ink! Ink your edges for a nice shabby look, use more then one ink (I used 3 here)
And last, but not least- learn to take better photos than I did (lol)
And here is a side view of this card

I wish you all a very Happy Passover!

חג שמח


Wednesday, March 28, 2012

Pre Passover Crafting from Crafting Jewish and a Giveaway!


In middle of all the pre-Passover hustle and bustle it's hard to think of crafting and other leisure activities. There's just so much to do. However, here we have an activity  from Crafting Jewish, by Rivky Koenig (Mesorah Publications) that can be just the break you and the kids need and can be a great "get the job done" motivator! Who wouldn't want to pick a prize out of the prize box after completing a job?


“cleaning for pesach” checklist

What you will need:
1 (8½"x11") sheet cardstock or heavy paper
markers, optional
scissors and glue
ruler and pencil
1 (12"x12") sheet patterned
scrapbook paper
peel-and-stick magnetic
tape

How to do it:

1. Download the Pesach checklist template onto cardstock or heavy paper. Or, create your own checklist. Decorate with markers if you wish.
2. Use the ruler and pencil to measure and draw a 9"x11½" rectangle on the scrapbook paper. With scissors, cut out the rectangle. Glue the checklist to the scrapbook paper.
3. Cut two pieces of magnetic tape and attach them to the top and bottom of the back of the scrapbook paper.

Estimated time: 10 minutes

Here's my version of the prize box; made with Crafting Jewish Style matzo paper (love it!) and embellished with some stickers-it took less than 15 minutes to make. I filled the prize box with slips of paper with promised prizes that the kids love!


prize box
What you will need:

ruler and pencil
1 (12"x12") sheet patterned scrapbook paper
small tin or box
scissors
scrap of white paper to fit the front of the box
tape runner or double sided tape
alphabet stickers
brown ink pad, optional

How to do it:
1. Measure, mark, and cut a strip of scrapbook paper to fit around the tin. Attach strip to the tin with tape runner or double-sided tape.
2. Place the tin’s lid, face down, on the remaining paper. Trace around the lid. Cut out the traced shape and attach to the top.
3. Cut out a rectangle of white paper to fit on the front of the tin. Decorate it with stickers spelling out the words “Prize Box.”
4. Use tape runner or double-sided tape to attach the white rectangle to the center of the tin.
Optional: After cutting out the white paper rectangle, rub a brown ink pad lightly around the edges.

Estimated time: 15 minutes

How would you like to win a copy of Crafting Jewish? It's filled with loads of wonderful Passover crafts and recipes and one lucky winner will be getting a copy and a slew of Passover scrapbooking goodies.
Tell us how you are preparing for Passover. Do you stay home or got to relatives? Are you crafting something wonderful for the Seder? How do you keep the kids involved? Leave a comment to be entered in the Passover giveaway!

Giveaway ends on April 4th.

Wednesday, March 21, 2012

Happy Passover!

It creeps up every year. Just as you are thinking how fun Purim was... bam! Time to start thinking about Passover. This card is the first and only step of my Pesach preparations, so far. 


May the rest of Pesach planning be as fun (and easy) as making this card.


Wednesday, March 14, 2012

We have a sketch for you!

Sketch time! Sketch time! Today we are sharing a simple and versatile sketch that our own Nili made for us.

Rachel used the sketch to scrap the pictures from Purim 2012. She swapped 2 rows of pictures and added great embellishment cluster in the upper right corner.
 

Shir pulled out two beautiful pictures from last year Purim. I love the stitching and the piece of lace under the picture!
 

Lisa chose to use pictures from the summer camp program where the kids created an amazing "Tree of Peace". How cute is the misted tree in the background? I also love the distressing and Lisa's signature journaling around the edges of the layout.


I found pictures from Purim 2003, with little Lila dressed as a bride and Ella as a chubby fairy. I remember that white tutu came with the wings but she probably refused to put them on. I followed the sketch and added only minimal embellishments. The title letters are cut with Lifestyle Crafts alphas from the Hanukkah kit cover.


We would like to see your take on this sketch! Link  your projects in the comments below.

P.S. Shh, don't tell anyone but Passover is less than 4 weeks away!

Sunday, March 11, 2012

Purim layout

Hi,
It's Shir and I want to show you the last layout I created.
Every Purim I create a layout from last year's picture... It's too early to print this years pictures, and I can always find pictures from last year...
Anyway - Mor wanted (insisted) to be a cop. It was surprising. We expected her to be a princess, a fairy, or any other costume with dress and/or wings :-)
After I bought her the uniform and few accessories.
The next step was to put a picture in her badge - that's not a problem for someone like me, who has tons of pictures :-)
Then, she wanted a horse (!). I didn't want to buy a horse for 1 day, so I decided to create a "scrappy horse": I cut a horse head shape, adhered grosgrain ribbon to create a bridle and added a brad, buttons as eyes and I tied knots of yarn for mane...

Now you have to wait a whole year for this years pictures.... Maybe not :-)
I appreciate your comments....