Wednesday, January 26, 2011
Scrapbooking and Papercrafting with Crafting Jewish Style-Silhouette Tutorial
Got Snow?
This card says it all! We have lots of it-with more on the way! It doesn't seem like winter is going away anytime soon! Wouldn't you love to be doing this?
See how nicely CJ Style products translate into everyday layouts and cards...
Anyway, let's think positive thoughts, summer is just a few months away! I hope this snow doesn't mess up preCHA plans...flights are being cancelled left and right..uhoh!
I love scrapbooking.
I love putting together layouts and telling a story through the pictures and embellishments that I have chosen.
I love having special and mundane moments-particularly the everyday moments in time- documented in a creative way.
I love looking through my scrapbooks and seeing how my style has evolved over time. (no more bubble lettering!)
I hate not ever being caught up with my pictures.
I hate that I'm never sure if a layout is ever done.
I hate that I always think it's not good enough (good enough for what-I'm not sure...)
That's why I love using scrapbooking products for my own crafty fun. I love playing with the paper, and embellishments and using them on all different surfaces to add some extra goodness to projects-with no pictures and journaling to worry about!
A silhouette is a fun papercrafting project that is quick, easy and personal. Best of all, you only need basic supplies for it!
There are many tutorials for silhouettes floating around. These instructions are really simple; no photoshop skill required!
What you will need:
side profile photo
pencil and paper
fine tip black marker
scissors
scrapbooking paper and solid cardstock-we used paper from the Passover line
gluestick or double sided tape
frame
Directions:
1. Print out photo in black and white on regular paper. Or, take photo and copy in black and white on regular paper. Enlarge or reduce photo to your preferred dimensions.
2. Outline profile with the black marker
3. Cut out silhouette along the black outline.
4. With the pencil,trace the cut out silhouette onto the back of your solid cardstock and cut out.
5. Glue the silhouette to the patterned paper and place in frame.
Standback and admire your handiwork!
Do you papercraft? Or are you strictly into scrapbooking?
What's your favorite project? How do you know when a layout is done? Do you get "layout anxiety"? Drop us a line, especially if you are enjoying a snow day!
For those of you attending CHA and/or the NY International Gift Show, Crafting Jewish Style will be having reps and/or designers at both shows who would love to meet with you! Contact us to set up an appointment. We can't wait to meet you!info@craftingjewishstyle.com
Sunday, January 23, 2011
January sketch
In January our Design Team worked on this simple sketch.
Louise turned the sketch on it's side and used a combination of Hanukkah and Rosh Hashanah papers to make this beautiful layout of her son receiving his special Siddur, decorated by Louise.
Lisa used a picture from Hanukkah family party and various papers and stickers from CJS Hanukkah collection to create this beautiful layout.
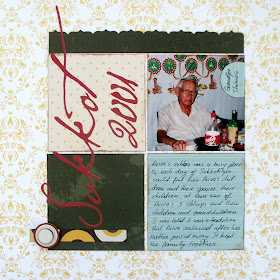
While I was looking for the picture to scrap I found a picture of my husband's grandfather - Saba Shimon. Saba Shimon passed away last December and I decided that I want this picture in our family scrapbooks. The picture was taken during Sukkot 2001. I stretched the sketch into a double pager and added the photos of his grand-grandchildren from the same day. All papers are from CJS Rosh Hashanah collection.
Did we inspire you? We would love to see your creations using the sketch. Please share!
Wednesday, January 19, 2011
Not Just for Holidays!
One of my favorite things about the Crafting Jewish Style papers is how STYLISH they really are! From polka dots to stripes, subtle prints to damask, the papers are just simply beautiful. Like quality style, they are very versatile, too. I love that because of this, I can use the papers for other Jewish Lifecycle Events like my daughter's Bat Mitzvah. In this case, I used the Rosh Hashanah Golden Damask paper and the Black Damask that is printed on the inside of the Paper Pack insert to create this lovely title page for my daughter's Bat Mitzvah book.
Don't be afraid of good style and be sure to share with us your creations that showcase the CJS papers for a Jewish Event that is NOT holiday related! I can't wait to see what you create!
Tuesday, January 11, 2011
Celebrate the Lights
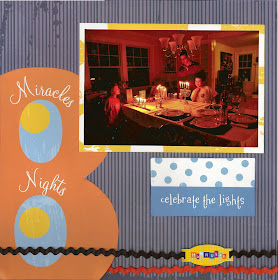
Hanukkah is one of the few events in the yearly calendar where you get more than one opportunity to take the same picture. In a house with beige walls, I really need multiple opportunities to get the candle-lighting picture just right. This year, I finally got the photo the way I want it, with the light from the candles glowing on the boys' faces and the candles reflected in the window. I also like that the photo shows the dining room table set for nice meal. We normally eat in the kitchen, but during holidays, including Hanukkah, we eat in the dining room.
Since this photo speaks for itself (in my mind), I decided to skip the journaling and keep the layout simple. The papers from the Hanukkah kit were perfect for my layout celebrating the lights on the holiday.
Monday, January 10, 2011
Crafting Jewish Style Layouts and other fun stuff!
Hanukkah and winter break is over. Back to the old grind...work,school,work...snow day! Take advantage of the time indoors (even the South has been hit with snow) and craft some loveliness. We received some wonderful layout and card submissions here, at Crafting Jewish Style, that we'd love to share, and take a look at the prize package sent out to Deb, the winner of our Hanukkah giveway. We can't wait to see what she comes up with!
Love how Irit S. scrapped the candlelight and the food (of course!)in these layouts. So much beautiful handmade detail on each layout.
Chaya K. submitted these simple, yet graphic cards plus this menorah layout featuring loads of CJ Style goodness.
Lisa S. made use of the Rosh Hashanah damask paper for this stunner that was featured on Scrapstreet.com.
Finally, we have this humorous layout from Lauri, of her Jewish mom , as a little girl, in 1950! Oy vey!
Have you scrapped your Hanukkah memories yet? Are you using this cold weather as an excuse to scrap? Have you used your Crafting Jewish Style products in a fun way?
Leave us some love and submit your layouts-we'd love to share!
Wednesday, January 5, 2011
Getting ready for Tu bi'Shvat
I hope you had recovered from Hanukkah celebrations and from the holiday season. New year is here, with new adventures, new holidays to celebrate and new crafty projects.
In two weeks from today, January 20th, we will celebrate Tu bi'Shvat. While our friends in Israel will be admiring almond blossoms and planting new trees, we will be looking outside the windows at the snowy desert, sipping hot cocoa and thinking about warmer places that are far far away.
We can not plant trees in January but we can eat their fruits. We mark this day by eating fruits from the Land of Israel, mainly dried ones like figs and dates, raisins and almonds. I will share with you a recipe for my favorite Tu bi'Shvat cake. It is dense, sweet and so very yummy!
Tu bi'Shvat Cake
Ingredients: (for 2 small loaf pans)
6 oz chopped walnuts
6 oz chopped almonds
4 oz white raisins
6 oz dried apricots
4 oz prunes
12 Tablespoons sugar
14 Tablespoon self rising flour
3 eggs
3 Tablespoons brandy
1. Preheat oven to 300F
2. Roast nuts in shallow frying pan for few minutes
3. Chop dried fruits coarsely
4. Mix all ingredients together
5. Transfer to a greased loaf pans and bake for 1.5 hours until the cake is deep golden-brown.
6. Cool for 12 hours before serving
You can store the cake in refrigerate wrapped in the aluminum foil for several weeks.
Chopped nuts in the frying pan
All ingredients in the mixing bowl.
Ready to go in the oven.
Yummy!
Happy New 2011!
The cake makes a great hostess gift since you can make it in advance. I made a simple sleeve using beautiful papers from the Rosh HaShanah kit to dress up the cake. I cut a 4"x12" paper strip, scored it at 4", 1.25", 4" and 1.25" and glued together to form a sleeve. (Yes, I measured my cake). Cute label and few punched flowers - viola!
I couldn't leave you without my favorite dried fruit recipe. It brings up great childhood memories. It is not the same recipe that my grandma used but it is very good. It is from a fantastic cookbook "The Book of New Israeli Food" by Janna Gur.
Dried Fruit Compote
Ingredients:
2 cups dried apricots
2 cup prunes, with pits (to maintain the shape)
1 cup dried apple rings
1.5 cup raisins
1 cup sugar
1 cinnamon stick
1 lemon cut in half
1. Put the ingredients in a large saucepan. Add water to twice the level of the fruit. (It turned out really sweet so I added even more water after it was cooked)
2. Bring to a boil, lower the heat and cook for about 30 minutes.
3. Refrigerate and serve well chilled.
Happy New 2011!